TEACHING TIP: How To Use Anchor Charts During Distance Learning


If you have been following me on Instagram for a while, you probably know that I LOVE making, using, and displaying anchor charts for my students. As we have been transitioning to virtual learning over the past several months, I've been brainstorming ways that anchor charts can still be used and I've come up with a few ideas that I wanted to share with you all!


Before starting the lesson, whether you are going to pre-record or teach the lesson live, create the outline of the chart. By outline I mean the title, headings/subheadings, and boxes or spaces that you want to add information and examples to. I have found that this is SO helpful for guiding my lessons and helping me to make sure that I don't leave any teaching points out.


The next step is to decide which parts of the chart that you want to fill out with students and which parts you want pre-filled.  For example: If I had already taught my students about Chronological Retelling in another lesson, I would fill out the boxes to show what that looks like ahead of time and just review them quickly at the beginning of the lesson. If I hadn't already gone over that with them, I would do that part during the lesson and invite students to help me fill out the boxes in that part of the chart. 


If you are allowed to pre-record your lesson (or at least parts of your lesson), you could record a video as you introduce the topic of the lesson and complete the parts of the chart that you do not need to fill out with students. That way, you'll save time when you are in a live meeting with students and you can post the video for students to watch if they miss the lesson and/or need a refresher without having to worry about the legal issues that go with sharing videos that include students. 


During a live lesson, you could put the chart under a document camera and invite students to help you fill it out. Students could share input by raising their hands and talking or typing responses in the chat. One option that the teachers at my school and I have considered is filling out parts of the chart as a class during the live part of the lesson and then asking students to share what they would write for the unfinished parts of the chart as an exit ticket or homework assignment.


For example: for this lesson I would work with students during the live part of the lesson to fill out the first example of a summary/synthesis. Then I would leave that as a model and ask them to complete the second example for their exit ticket/homework. I would remind them to reach back in the story and find relevant details to support the second prompt that I put on the chart. In the next lesson I would go over their answers and finish up the chart.


For either a live or pre-recorded lesson you could choose to type onto the anchor chart and share or record your screen and narrate as you fill out the chart. If you are using one of my anchor charts, there are several ways to do this. You can take the image version of the chart and use it as a slide background on Google Slides, Keynote, or PowerPoint and just add editable text boxes. You can also open the PDF version with whatever PDF reader you use and add text to the boxes.


Once you have completed the chart, you can either save a copy of it or take a screen shot and share it with students so they can refer back to it as they work. I've seen a lot of teachers creating virtual classrooms and I think it would be super cute to hang anchor charts on the walls of those virtual rooms (although, I have to admit - I'm not sure how those work and/or if that is even possible). You can also add a picture of the completed chart to any and all related assignments so students can refer back to it by copying it onto slides or linking it on whatever platform that you are using.


One way that I like to use anchor charts in my classroom is to teach a lesson and then provide students with a blank copy of the chart to use as a graphic organizer. I usually use our class read aloud to teach the minilesson and then ask students to repeat the steps that we took to apply a strategy to the books that they are reading independently. Again, you can create an editable version of any of my charts by taking the image version of the chart and using it as a slide background on Google Slides, Keynote, or PowerPoint and adding editable text boxes.


I hope that you found this post helpful and I would love to hear other suggestions or see how you are using anchor charts in your classrooms during distance learning! These are all, of course, also options for when you are in the classroom and want to save time and paper.


The lesson and anchor chart featured in this post are from my Interpreting Characters Reading Unit for 4th grade that you can check out here

0

Interpreting Characters: A 4th Grade Reading Unit


I just finished up the plans and resources for the first bend of the first 4th grade reading unit, Interpreting Characters, and I wanted to share some helpful information and a FREE sample with you! 


Before we get started, I just wanted to let you know that this unit is NOT DONE. The plans and resources for bends I & II are included, but when I asked you guys on this post on Instagram when you were heading back to school, many of you responded that you had already started or were starting soon, so I wanted to get this resource to you as soon as possible!

THE GOOGLE DOC

When you purchase this unit, you will receive a link to a Google Doc called Interpreting Characters Overview & Lesson Plans (pictured below). This document is the homepage for everything that you need to teach this unit! It includes an overview of the skills taught in each bend, an overview of each session, lesson plans for each session, and links to all of the anchor charts and resources for students.

Because I know that not every school is doing distance learning and, for those that are, not all are using the same platform(s), I have included Google, Powerpoint, and PDF versions of all of the resources for this unit. In the Resource Table of Contents section, you can select the format that you need and download that directly from my Google Drive!


GETTING READY TO TEACH THIS UNIT

The read aloud for this entire unit is the book The Tiger Rising by Kate DiCamillo. I was able to borrow the e-book from my library, but you can also get a digital copy on your Kindle through Amazon or on your iPad through the iTunes book store (it was only $2.99 on there the last time I checked). Your students do not need their own copies of this book, but they will need access to multiple fictional texts to practice applying all of the skills that you teach & model with the read aloud.


THE READING NOTEBOOK

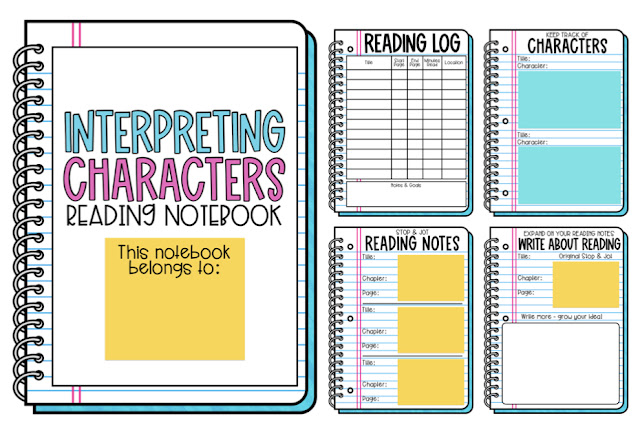
I have included digital versions (Google Slides & Powerpoint) of the notebook that contain editable boxes for students to type into as well as PDF versions in color and black and white that can be printed and filled out by hand.

The Reading Notebook contains 6 pages that students can use to take notes and complete assignments throughout this unit. The following pages are included: 


  1. Cover: Editable cover page where students can write their names.
  2. Reading Log: A place for students to record titles, pages read, minutes read, and location. There is also a section for students to take notes on their progress and set reading goals.
  3. Keep Track of Characters: A page for students to jot down notes about characters.
  4. Stop & Jot Reading Notes: A page for students to write short notes with important details and things that stand out to prepare for conversations about their books and for writing about reading. 
  5. Write About Reading: A page for students to expand on the notes that they jotted while reading.
  6. Reading List: A place for students to keep a list of the books that they would like to read.

LESSON PLANS

For each session there is a full or half page summary of the lesson from the teacher manual that includes the connection, teaching point, active engagement, link, mid-workshop teaching point and share portion of the lesson. 

ANCHOR CHARTS

There are four anchor charts that you will need to teach the lessons in the first bend of this unit:

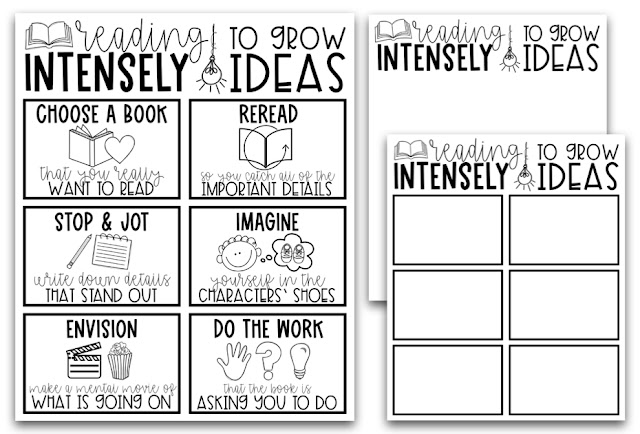
  1. Reading Intensely: On this chart you will record strategies and tips for reading carefully and paying close attention to details in the story in order to form substantial ideas.
  2. Figuring Out If A Book Is Just Right For You: You will use this chart to teach students how to determine whether a book is too easy, too hard, or just right for them.
  3. Finding Books That We Want to Read: You will use this chart to record student input from an inquiry that you lead about how students will discover and obtain books that they want to read.
  4. From Retelling to Summarizing: You will use this chart to teach students the difference between a chronological retelling of events and a summary/synthesis of recent events that includes relevant information and events from earlier parts of the story.

For each anchor chart, I have included multiple options so you can choose how you would like to use them. You can simply print out or project the completed versions and share them with students or use them to guide your teaching as you complete the charts together. There are also blank versions of the charts with only titles and headings/subheadings that you could fill out with your class as you teach each lesson and students provide input. Below is an example of a completed chart and the options for blank charts that you would complete with your class.


FREE SAMPLE

Click on the image below to visit the page that this unit is listed on in my TPT store. In the preview, you will receive the lesson plan for Session 1. You may use the picture on this blog post to recreate the Reading Intensely anchor chart that is needed for this lesson.


1
Back to Top